

This is a guest blog by Richard Duinmayer and Gert-Jan Bartelds of Avisi, an Atlassian Expert based in the Netherlands. Richard and Gert-Jan are members of Testnet, the Dutch software testers’ professional association. On November 8th 2011 they took part in a Testnet workshop on usability testing. More specifically, the topic was “the use of paper prototyping in usability testing”, below is their experience report.
What is Paper Prototyping?
Paper prototyping an application is:
- Building (parts of) an application’s GUI using low-cost materials, such as pen and paper.
- Executing end-user scenarios against that paper GUI, effectively testing the GUI’s interaction design.
- Feeding the knowledge gained back into the design of the real application’s GUI.
Wikipedia offers the following definition:
In human-computer interaction, paper prototyping is a widely used method in the user-centered design process, a process that helps developers to create software that meets the user’s expectations and needs – in this case, especially for designing and testing user interfaces. It is throwaway prototyping and involves creating rough, even hand-sketched, drawings of an interface to use as prototypes, or models, of a design. While paper prototyping seems simple, this method of usability testing can provide a great deal of useful feedback which will result in the design of better products. This is supported by many usability professionals.
Executing a Paper Prototype Test
Executing a paper prototype test is having one or more test subjects (end-users) sit down in front of the paper GUI, and having them interact with it. The end-user is given a specific task (like “Buy a book on this website” or “Get in contact with this company”) and observers are present to take notes of the user’s interactions. It is of course possible to use a camera to record the user actions, so you don’t actually need observers present. However this makes the method a bit more formal and more expensive or complicated to set up. In general, human observers work just fine (as long as they can be quiet!).
Paper Prototyping is a low-level, low-cost method that helps to find out how well your GUI is suited to perform specific tasks. It can answer questions like:
- Are end-users doing what you want them to be doing?
- Are they doing what you expected them to do?
- Did they become confused while trying to reach their goals?
- Did you really think through all possible paths through the application?
- Did they have a preferred path?
- Are some paths unused?
- Are some paths used in ways that weren’t intended?
Paper Prototyping Case Study
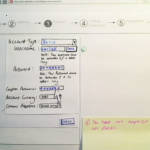
During the Testnet workshop, our assignment was to create a proper paper prototype that would support the following:
- User can access the homepage of an online shop
- User should be able to buy a pair of boots without heels.
- User must be able to choose from the available brands, colors and sizes
The scenario ends with the user putting the chosen type of boot into their shopping cart.
The workshop attendees were divided into 3 groups of 4~5 people each, and each group made their own paper prototype. We had 45 minutes to do this. So our group got busy discussing GUI design options for a while, after which, we drew, cut and assembled the various GUI elements we needed for our design.
Roles in Paper Prototyping
There are 4 roles, which were distributed amongst team members:
- Tester – The one who was going to test the other teams’ prototypes. This person was asked to “think aloud” while testing the prototypes, to give observers context.
- Computer – This person should remain silent and react to the tester’s commands using the GUI components. For example, when the tester presses the arrow on a drop-down-box, the “computer” had to quickly grab the specific paper GUI element (the drop-down list) and add it to the “website”.
- Assistant-computer – In times of need, an “assistant-computer” was there to give the “computer” some extra processing power! (i.e., on-the-fly cutting and pasting of missing GUI elements).
- Observer – This/these person(s) wrote down everything the tester said and did but especially what they didn’t/couldn’t do or had difficulty with.
Each prototype was used by two testers from each of the other groups.
Running the Prototype
In the first test run, we found out that the tester was able to go through the first steps (selecting size, brand and type) with relative ease. However, the process of “buying” (putting a product in the shopping cart) apparently wasn’t worked out very well by our group. What happened is that there was no response when the user “clicked” on the shopping cart button. Our solution was then to display an “hourglass” or loading icon on the “website” so the user knew something was happening while the computer and the assistant-computer were busy assembling the new screens and messages. After this change, testers could add their selected items to the shopping cart with no problem.
The subsequent test runs all went smoothly, mainly because we were able to quickly adjust the prototype with the feedback we got on the first test run.
And the Winner Was…
From the 3 groups, the team that “won” (there was no real competition but they did offer a fine bottle of wine) was the one that placed a search engine on the website. Apparently users liked to simply search for their product instead of clicking through menus and using the standard drop-down boxes for their selection.
Paper Prototype in Action
Below you will find two videos showing Paper Prototyping in action.
In the second video, notice the user thinking out loud while navigating the “website”. Also note there are four hands, two from the user and two from the “computer”.
Video by chrisneale
Video by NotesSensei
What Do You Need?
So what you need to start paper prototyping?
- Sheets of paper (good to have multiple colors)
- Pens (also in multiple colors)
- Scissors and/or X-Acto knife
- Glue and/or tape
- Optional: Stickies of different colors (useful for “popup” messages like a loading screen or error messages)
- Imagination!
Our Conclusion
Admittedly, at the beginning the workshop we were all rather giggly, working with paper, scissors and glue like some 5-year old kids in kindergarten. But we soon became more serious as meaningful GUI design discussions picked up. And after the first test-run, when we discovered we had missed quite a few interaction paths, we all realized this paper prototyping technique was actually rather interesting and usable for our daily work.
We think paper prototyping is an interesting and flexible tool for use in the early stages of a project. It can really help guide the user interface design. Using this technique is a quick an low cost way to test your thoughts on how the application’s GUI should work. In any case, it is certainly quicker and cheaper than actually coding it and then having to change it all when you inevitably discover flaws… It’s also quicker than wireframing in our experience.
An added benefit of using this technique is that the impact of the eventual graphic design of the GUI is a total non-factor. This allows testers (and the design team) to concern themselves only with functionality, without distractions. And then, when you later apply the graphic design, you have a wealth of information about the user interaction and how you need to direct it.
Your opinion on Paper Prototyping?
So how do you use Paper Prototyping? In which cases and situations? Does it provide you with better design, better user interface, better testing and thus better applications? Or is it just a way to go quicker through the initial design phase?
We’d love to hear about your experiences!
The Atlassian Agile series: This is the latest guest blog by top agile experts using Atlassian products. Visit atlassian.com/agile for more Agile resources — plus find other interviews including those with Zynga, OpenDNS, OfficeDrop, John Muir Health, PBS, Interspire, and many more.
