Recently, I’ve redesigned of the Atlassian development tutorial that introduces developers to our software developer kit (SDK) . This is the second of a three-part series of blogs related to this project. Part 1, What is Your Tutorial’s Funnel Conversion Rate introduced the assignment and the funnel conversion report I use to measure its success. In this part, I show you how to create and configure your own Google Analytics goal funnel so that you can measure a tutorial’s funnel conversion rate on your site. Part 3 provides some tips and tricks learned during the process.
Happily, you don’t need to read Part 1 to use the information in this blog.
Atlassian technical writers provide a series of blogs exploring the latest techniques in technical communication. These blogs are about our projects, experiments, and ideas. Through this series, we share the techniques we use to give our customers the sweetest documentation in the world.
You Should Know before You Begin
Typically, a funnel conversion measures marketing goals such as, how many users signed up for a conference. In this case, I want to measure how many users “complete a tutorial” by reading through each page and reaching the last. In Google Analytics speak, this is a URL destination goal.
A goal funnel is the series of pages a user traverses to reach the URL destination goal. You can specify whether the first page is a required step in the funnel or not. For my tutorial, I expect experienced users to skip set-up or configuration pages. Other readers might dive in at only these pages to check or troubleshoot. So, the first step is not required.
Before you go about setting up a funnel goal, your tutorial must be suitable for this type of measurement. Your tutorial should be made up of at least two HTML pages. Both of the tutorials I currently track have at least 5 pages.
In case it is not obvious, you can only configure goals on sites that are tracked by Google analytics. You need an account for your site’s Google analytics console. Also, you need administrative rights or the help of someone who has them to configure a goal for a site. If you following this procedure, you build up exactly the information you need to hand off to your administrator.
Google limits the number of goals on a site to 20. Once you use a goal, you can’t delete it. You can deactivate it or reconfigure it to measure something else.
Finally, make sure the funnel’s pages are already on your site and that they contain the analytics tracking code.
List the Pages in Your Goal Funnel
The first step is to list the pages in your funnel. The funnel I am creating starts on this page — Set Up the Atlassian Plugin SDK and Build a project. You can use it as a reference to help visualize this procedure.
- Create a new text file called tutorial_goal_funnel.txt in your favorite editor.
- Add a heading that looks like this:
Goal Funnel:
- In your browser, go to the first page in your tutorial.
- Copy the URL address for the first page of your tutorial into tutorial_goal_funnel.txt beneath your new heading.
- Remove the first part of the URL from the protocol to the site name leaving behind a forward slash (/) followed by the page location.For example, this URL:
https://developer.atlassian.com/display/DOCS/Set+up+the+Atlassian+Plugin+SDK+and+Build+a+Project
becomes:
/display/DOCS/Set+up+the+Atlassian+Plugin+SDK+and+Build+a+Project
- Repeat this for each page in the tutorial.
- Add a few empty lines between the second to last and the last line.
- Add a heading right before the last line:
Goal URL:
When you are done, the file lists each URL in your tutorial’s funnel. My file looked like this:
Goal Funnel:

/display/DOCS/Set+up+the+Atlassian+Plugin+SDK+and+Build+a+Project
/display/DOCS/Set+up+the+SDK+Prerequisites+on+a+Windows+System
/display/DOCS/Set+up+the+SDK+Prerequisites+for+Linux+or+Mac
/display/DOCS/Install+the+Atlassian+SDK+on+a+Windows+System
/display/DOCS/Install+the+Atlassian+SDK+on+a+Linux+or+Mac+System
/display/DOCS/Explore+the+Installed+SDK+and+the+atlas+Commands
/display/DOCS/Create+a+HelloWorld+Plugin+Project
/display/DOCS/Set+Up+the+Eclipse+IDE+for+Windows
/display/DOCS/Set+Up+the+Eclipse+IDE+for+Linux

Goal URL:

/display/DOCS/Put+the+Final+Polish+on+the+Project+in+Eclipse
- Save your tutorial_goal_funnel.txt file.
Create Exact Matching with Regular Expressions
Goal funnels rely on Google Analytics’ ability to match your funnel URLs exactly to pages on your site. This is easy if your tutorial pages have simple URLs. For example, a simple URL in the Python tutorial site looks like this:
http://docs.python.org/tutorial/appetite.html
and would translate in Google Analytics to a URL location like this:
/tutorial/appetite.html
My tutorial pages are Confluence wiki pages. Spaces in a Confluence page title translate into + (plus signs) in the URLs. Special characters can be problematic in matching pages.
Also, my tutorial supports users that are using Windows or Linux systems. So, for example, I expect and guide the Windows users to skip the Linux-specific pages in the tutorial. The paths for each OS-specific funnel are:
 ”
”
Some actions both types of users have in common. For example, both must set up prerequisites for their respective environments. So this one funnel action has two possible pages for a single point in the funnel.
Thankfully, Google Analytics understands regular expressions (regexp). (If you are unfamiliar with regular expressions see this blog post from Blue Glass for a quick primer.) Using regular expression I altered my funnel tutorial_goal_funnel.txt list to this:
Goal Funnel:

^/display/DOCS/Set\+up\+the\+Atlassian\+Plugin\+SDK\+and\+Build\+a\+Project
^/display/DOCS/Set\+up\+the\+SDK\+Prerequisites\+*
^/display/DOCS/Install\+the\+Atlassian\+SDK\+on\+a*
^/display/DOCS/Explore\+the\+Installed\+SDK\+and\+the\+atlas\+Commands
^/display/DOCS/Create\+a\+HelloWorld\+Plugin\+Project
^/display/DOCS/Set\+Up\+the\+Eclipse\+IDE\+for*

Goal URL:

^/display/DOCS/Put\+the\+Final\+Polish\+on\+the\+Project\+in\+Eclipse
The regular expressions I constructed in my list translates as follows:
- ^ (caret) says match a page that begins like this.
- \ (backward slash) says treat the next character as a regular character — not a regular expression character. Otherwise, the plus sign would signal Google Analytics to do some processing.
- * (asterisk) says match the character before it and any other number of characters that come after.
So, the regular expression I created in my list:
^/display/DOCS/Set\+up\+the\+SDK\+Prerequisites\+*
matches either of these two pages from my original funnel list:
/display/DOCS/Set+up+the+SDK+Prerequisites+on+a+Windows+System
/display/DOCS/Set+up+the+SDK+Prerequisites+for+Linux+or+Mac
Go ahead and apply regular expressions to your list as needed.
Verify Google Analytics Matches Your Pages
Recall that, to measure your funnel’s conversion, Google Analytics must match URLs you specify to actual pages on your site. So, before you set up your funnel you must verify Google Analytics can find each page in your funnel. You do this by searching for each URL in your tutorial_goal_funnel.txt list. To do this, open your browser and do the following:
- Make sure you have the tutorial_goal_funnel.txt file open in an editor.
- Log into Google Analytics for your site.
Your company, like mine, might have multiple sites that they analyze. - Make sure the site containing your tutorial pages is selected as the current site.
- Select the Standard Reporting button.
- Choose Content > Site Content > All Pages from the left hand menu.
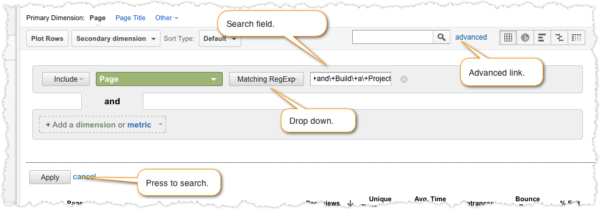
By default, Google Analytics shows a ranked list of all your site content. - Look for the search field.
- Click the advanced link.
The advanced search options appear. - Change the Containing drop down to Matching RegExp.
If you found that your funnel URLs are really simple, you can use Exactly Matching instead. - Copy and past the first URL from your list and past it into the search field.
At this point your advanced dialog will look something like this:
- Press Apply to search.
The search should return the page in your funnel that matches. For example, matching a single page looks like this:

My search that matches two pages — one for Linux and one for Windows — returns results like this:

- Repeat the search for each page in your list.
If for some reason you can’t find a match, you may need to alter your URL or your regular expression. - Save your tutorial_goal_funnel.txt file.
This is your final funnel information. You are ready to create the goal itself in Google Analytics.
Create Your Goal in Google Analytics
If you have administrative rights in Google Analytics, you can do this procedure. If you don’t, you can give your list to your administrator to create it for you.
- Make sure you have the tutorial_goal_funnel.txt file open in an editor.
- Log into Google Analytics for your site.
Your company, like mine, might have multiple sites that they analyze. - Make sure the site containing your tutorial pages is selected as the current site.
- Press Admin.
The system displays the administrative console. - Select the Goals tab.
Each site has four sets that can contain up to 5 goals for a total of 20. - Choose a set with an available goal and press the Goal+ to add a goal.
The system opens a dialog panel. - Provide a Goal Name.
It is a good idea to provide some identifier to tell other admins who created a goal. So, I add my username to each goal I create. For example, I named one of my goals:manthony: Getting Started New
Now, other admins can find me.
- Click Active.
- Choose URL Destination for Goal Type.
- In the Goal Details section, copy the Goal URL from your tutorial_goal_funnel.txt file into the Goal URL field.
- Set the Match Type to Regular Expression Match.
- In the Goal Funnel section check Use funnel.
- Copy the first URL from the Goal Funnel in you your tutorial_goal_funnel.txt file to Step 1.
You can mark Step 1 as Required or not. If you set this, users reaching your goal page without traveling through this funnel page are not counted as conversions in the Funnel Visualization report. Only users who reach the goal URL after viewing this page are counted as conversions. I don’t mark this as required as I allow my users to enter the funnel at any point — and I expect experienced users to skip the first introductory page. It is entirely your choice. - Enter a Name for the step.
Google Analytics uses this Name in reports. - Repeat the last two steps for the remaining URLs in your list.
At this point, your goals configuration looks similar to this:

- Press Save to create the goal.
Your goal is live! It takes time to gather data on a goal. You should wait a couple of days before checking the Funnel Visualization report.
Check a the Funnel Visualization Report
After a couple of days and depending on how popular your tutorial is, you should have gathered some data on your goal funnel. To view the gather data collected from your funnel, do the following:
- Log into Google Analytics for your site.
- Make sure the site containing your tutorial pages is selected as the current site.
- Select the Standard Reporting button.
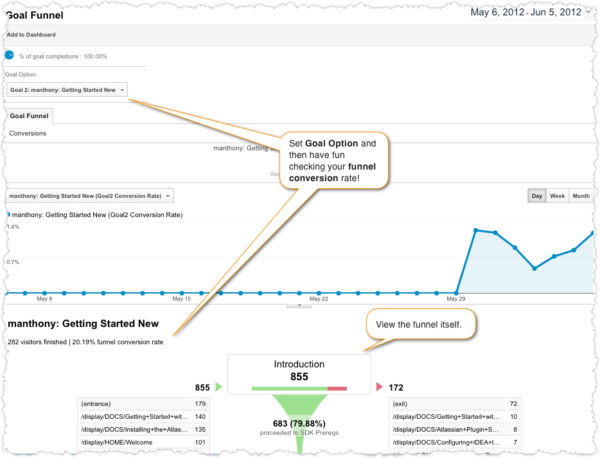
- Select Conversions > Goals > Funnel Visualization from the left navigation.
- Set the Goal Option to your goal.
The system refreshes and reflects your new report!
