If you’ve been following the recent posts about using Bamboo to set up a continuous delivery pipeline, you have probably noticed us talking about build artifacts. These are the products of the build itself: JARs, WARs, code coverage reports, test results, javadocs, rdocs… the list goes on n’ on. In this post, we’ll walk through some tips and tricks to keep in mind when adding artifact sharing to your Plans.
The Art of the Artifact
Sharing build artifacts within your Plan is a great way to keep your build process streamlined and reliable. By generating an artifact once and passing it around to Jobs in downstream Stages, you can
- tighten the feedback loop by eliminating duplicate checkouts and compilations
- ensure all tests are executing against exactly the same revision number or changelist
- verify your application not only packages itself correctly, but behaves as expected when unpacked and distributed
- do other cool stuff like send code coverage reports to your intranet or publish generated docs to 3rd party contributors
Pretty cool, right? And Bamboo makes artifact sharing pretty easy. Once you capture (or, in Bamboo parlance, “define”) an artifact, Bamboo puts it in a central location making it available to all downstream jobs. No need to explicitly pass it between jobs fire-chain style. You can also send it off to an external repository, or download it from the build results summary page in Bamboo to any local disk once the build is complete.
If you haven’t already taken advantage of this feature, hopefully you’re now interested in giving it a try. Let’s walk through a few common use cases and see how it’s done. You can refer to Bamboo’s online documentation as you are following along. And don’t forget, the images here can be viewed full-size to get a better look at the configs — just click on them to enlarge.
Share, Consume, Deploy, Test
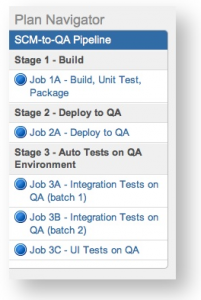
One of the most common reasons for passing an artifact is to take a packaged build and deploy it to an environment. There, it can be tested manually or by automated tests in subsequent Stages of your Plan. A use case like this needs at least 3 Stages in the Plan: build and package the code in Stage 1, deploy it to an environment in Stage 2, then execute tests against that environment in Stage 3. We’ll use a simple Maven project to illustrate.
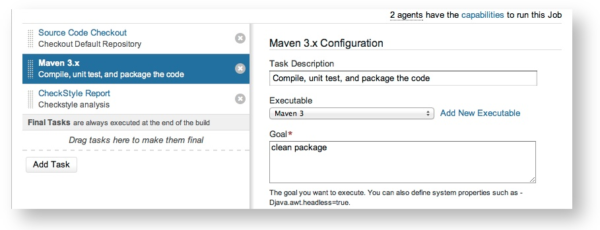
Below we see the Tasks for the first Job in a Plan: checkout the lastest code, package it, then run some static analysis on it. The artifact produced by this Job will be a .jar file, coming from the Maven Task (packaged with Bamboo). Artifacts are defined and shared at the Job level, so to pass it around, first we go the Artifacts tab inside the Job’s configuration, and click the Create Definition button.
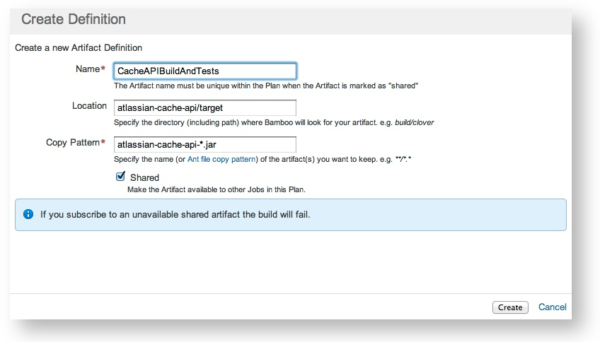 In the Create Definition screen, you will choose a name to identify the artifact, specify where it can be found, and what it’s name will be. The location is relative to the working directory for that Job. In fact, that will be true just about any time you specify a path. In this example, we have a multi-module Maven project, and we are sharing the package made by just one of the modules. When indicating the file name, you may use the wildcard character if the name changes from build to build (eg., it includes a timestamp or version number), or if you wish to capture multiple files from the location specified. And don’t forget to check the Shared box!
With the artifact defined, you are ready to pick it up in downstream Jobs. Note that only Jobs in subsequent Stages can utilize the artifact. This is because Bamboo parallelizes the Jobs within a given Stage whenever possible, and needs to ensure that the artifact has actually been created at the time a consumer Job wants to work with it. But never fear: there is no limit on the number of Stages allowed in a Plan, so create a downstream Stage and move the artifact-consuming Job into it if necessary.
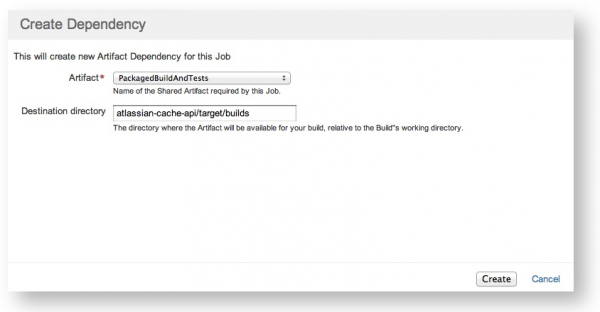
Go to the Artifacts tab again, this time in the configuration of the the downstream Job, and click Create Dependency. You will be able to select the artifact you just defined from a dropdown menu. If you don’t see it there, go back and make sure the “Shared” box is checked! Remember that you can only use this method for consuming artifacts produced by other Jobs in the same Plan. (More later on how to share them between Plans) Thus, only artifacts produced upstream in your Plan will appear in the dropdown. Select the artifact you want to work with, and tell Bamboo where to place it.
In our example Plan, the artifact-consuming Job runs a deploy script that expects the build package to be in ~/atlassian-cache-api/target/builds. You will need to create an artifact dependency for each Job that wants to work with it, in as many downstream Stages as you like. And because the artifact will already have been produced by the time those Stages execute, multiple Jobs within the same Stage can have dependencies on the same artifact. If you have multiple Tasks inside a Job that need separate copies of the artifact, or need to access it from different locations, you can create multiple artifact dependencies that place the artifact in different locations, as shown here.
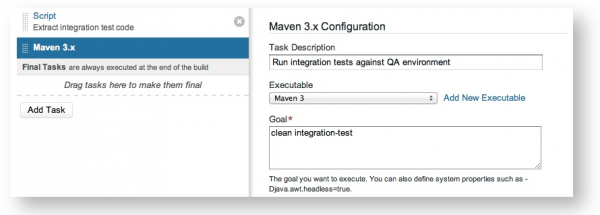
In the final Stage, we pull out the integration test code bundled with our application, and run them against the environment we just deployed to in the previous Stage. As I’ve pointed out in a previous post, capturing the application and test code simultaneously ensures the tests expectations are compatible with the application at that moment in time. For this reason, it is better to extract the tests from a shared build artifact than to grab the tests via another source code checkout.
Your Milage May Variable
At the risk of digressing, there was a relevant post to Atlassian Answers recently that warrants mention here. (How timely!) If you have multiple Plans that are essentially clones of each other except for the source code checkout directory, you can use Plan Variables to make the artifact definition for each Plan easier. First, define a Plan Variable whose value is the checkout directory or module name for that plan.
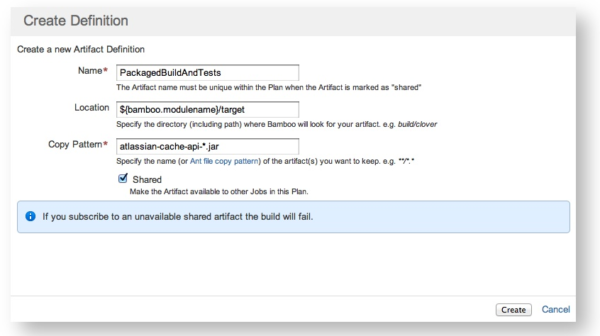
Next, use that variable in the Location field of your artifact definition, following the syntax shown here. Note that although Bamboo supports the “*” wildcard character in the Copy Pattern field, it is not supported in the Location field. (For more insight on that, see the related support ticket.) With the artifact configured thusly, you can clone the Plan to your heart’s delight and only need to define the variable. You may also find a use for that same variable if you need to specify a working subdirectory in your source code checkout or builder Tasks (Maven, MSBuild, Grails, etc.).
Don’t Fear the Repo
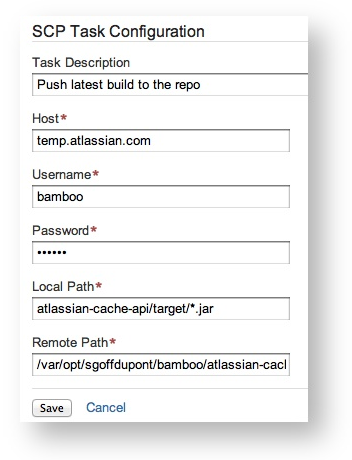
As mentioned earlier, artifacts can only be shared by Jobs in the same Plan. This is not a problem 99.9% of the time. But what if you represent the one-in-a-thousand chance that you simply cannot do everything you need to do with an artifact within the confines of a single Plan? The easiest thing is usually to create a Task that sends the artifact to an external location (be it a Nexus, Artifactory or Archiva repository, or a location on your corporate network). Often times, people use a script Task which executes a simple shell script that performs the transfer. Or you can install the Bamboo SCP plugin to use an SCP Task, as pictured below. For Artifactory users, the Bamboo Artifactory plugin provides a specialized Task for this purpose.
When using the SCP task to upload to your repo, it is easiest to pull the artifact directly from the workspace, rather than from the location where Bamboo stores shared artifacts. This is because the shared artifacts file structure has separate directories for each build, so you’d be pulling from a different directory every time. Your SCP Task configuration will look like…
- Task Description – You’re the boss here. Call it whatever you like.
- Host – This is the remote host you are uploading to.
- Username – A user that has access to the remote host.
- Password – The user’s password.
- Local Path – The location of the file you are uploading, relative to the working directory. Bamboo will workout the rest of the full path on your behalf.
- Remote Path – The full-path destination of the file on the remote host.
If you’re still reading this, Congratulations! It’s impossible to cover every use case and project type in these sorts of blog posts, so if you have questions as you’re working through this on your own, drop a comment here or in Atlassian Answers. Between the staff and our awesome user community, you’ll probably get a helpful response!
Try Bamboo
Download Bamboo for evaluation, or start a free trial of Bamboo OnDemand. Our support team, online documentation, and Atlassian Answers site are here 24/7 to help boost you over any hurdles you encounter.

